It is not advised to apply a new render over the old render (site batched or manufactured systems) because many factors are unknown regarding the compatibility of the new render. These unknown parameters, described in more depth below, include the quality, thickness, bond, and strength of the existing render and any applied surface treatments that may affect the adhesion of the new render.
You may encounter common problems and questions.
The application of several layers of render coatings
Traditional multi-coat render techniques are applied in layers, with the last coating being the weakest and thinnest. Because of this, top coat renders may be relatively weak, and it can be challenging to gauge how well the existing layers of render adhere to one another.
Stresses caused by extra materials
The weight of the previous layer(s) increases with each additional layer of render, which harms the overall strength of the bond between render layers and between render and the substrate.
Organic growth, soiled deposits, or paint
- Pre-existing renders frequently have a thin paint or coating applied, creating a weak surface that cannot be rendered.
- Over time-accumulated filthy deposits may create a thin intermediary layer that hinders the bonding of freshly placed render.
- Organic growth, although being brushed off the surface, persists in the substrate pores and has the potential to expand, separating the new render from the substrate.
Bad key
To bond to the wall, renders require a mechanical key and suction. Even if unpainted or uncoated, existing render surfaces are typically “plain faces” and infrequently have enough keys to support a fresh render.
What to look for If you still choose it?
The render and if it is painted should be examined first. This is a problem because if the old render is painted, the new render won’t be able to adhere to the old render because the paint layers will prevent the new render from adhering to the old render. If you choose to move through with the renovation without removing the paint from the render, you will likely see cracks in the new render six months after the project is finished.
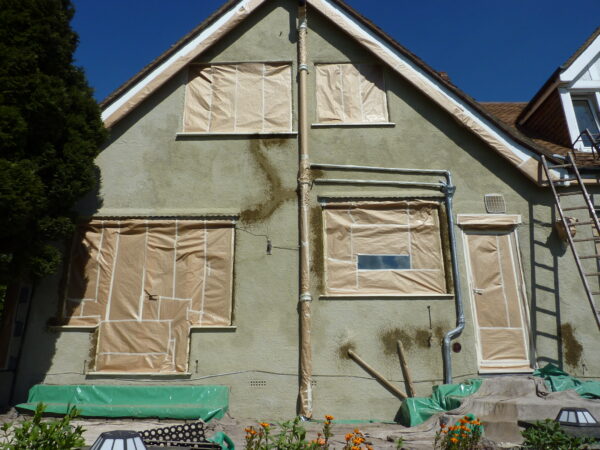
To apply the new render to the wall, you must first determine whether the present render is broken or coming loose. If it is, you must remove all loose renders from the wall. Checking to see if the render is hollow might be a good idea. Before you begin re-rendering the property, you must remove any hollow spots.
What to do instead?
Select your decorative option, then get the substrate ready.
Solution 1:
Prepare the substrate: Power wash soiled areas if the existing substrate is sound, evenly adherent throughout, not much thicker than 19 mm, stronger than the materials to be applied, and not painted or otherwise coated.
Solutions for decoration: Apply a final texture and provide a key with all primer solutions or premixed plasters.
Solution 2:
Surface preparation: Remove current materials if the above mentioned requirements cannot be met.
Solutions for decoration: Apply a full-specification thickness render and provide a key with Premix.
An Alternative: Using Decorative Solution
Only when the previous work is sound and has adequate adhesion across the entire area involved may further coats of render be applied safely. Over soft, brittle material, or if the existing render is thicker than 15mm, additional rendering coatings shouldn’t be applied.
1. Conduct a comprehensive inspection
Find cracks that are larger than 0.5mm and may be active. Make arrangements for crack measurements. Check to see if the wall is moving. To find portions of render or substrate that have come loose, sound the entire wall area. Verify the effectiveness of the building details and their compatibility for thicker render. The next step should be random hammer tests to ensure the render is completely bonded to the substrate.
2. Clean and treat the substrate.
Ensure the substrate is clear of any contaminants, such as dirt or grease. Purge and prepare the substrate. To ensure that moss developing and invisible spores are eliminated, allow it to cure for at least 48 hours.
3. Reset specifics
Using a 10mm profile bead and bead adhesive, reset the details.
4. Use a key coat.
Using a brush or loaded roller, the stipple finishes the aid at 2-3 mm. Give it minimum 48 hours to cure.
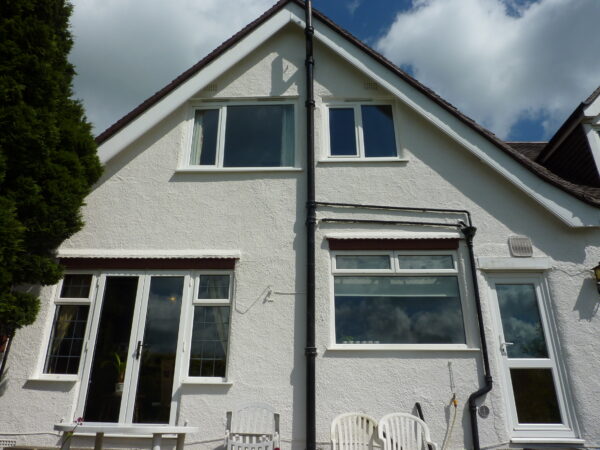
5. Apply render
Apply the new render of your choice and finish as desired, keeping in mind that the overall thickness of the complete render system—which includes the old render layers, layer of aid, and new render—must not exceed 25mm.
If you’d like, you might use a foundation coat of render before adding a decorative finish.
Conclusion
Lastly, if you decided to repaint over the existing render, make sure you select a lightweight render technique rather than a conventional sand and cement system. You can obtain this effect using a thin coat application or another lightweight render solution.