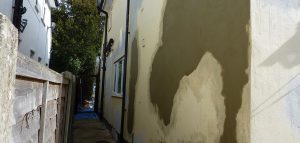
Patching is easier than to render vast areas, which requires expertise. You might need to budget for complete wall redecoration because “invisible” repairs, even in the hands of skilled craftsmen, are challenging to complete.
To avoid traditional lime render failing around the edges of the repair, traditional lime render on historic buildings should never be patched with cement. This prevents moisture in the wall from evaporating, forcing it out to the edges of the new patch. Another option is to clothe the wall with something appropriate, such as old-fashioned tiles suspended from battens fastened over the old render.
Up to 0.5 m2 of small patch repair will cost about £75.
How to Patch and Repair Painted Walls
In that, it is blended to a specific consistency and then applied to a wall surface in two coats; rendering is similar to plastering. However, unlike plastering, the thin render coat is placed first, and the heavier finishing coat is applied.
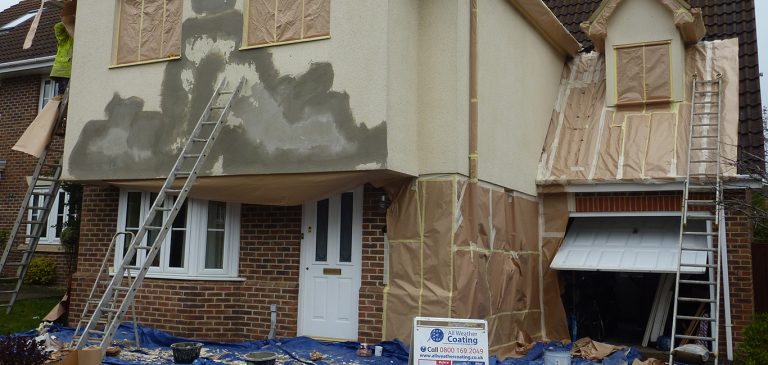
1. Eliminate outdated, damaged renders and objects
The old and damaged render must all be removed back to the wall’s surface before any new render can be applied. With a claw hammer, begin chipping away the old render at the damaged area until you reach the brick or block wall underneath.
Work from any damaged parts outward until you reach the edges of any solid and sound render. Any blown or damaged render will sound hollow when tapped; therefore, tapping with your hammer can assist you quickly and readily locating these damaged areas. Continue chipping away at the render until it has completely been removed from the wall.
The best instrument to use while removing render with a claw hammer across a big area is a small breaker with a cranked chisel to save time and energy. The chisel’s chipped angle makes it simple to pry the render from the wall while allowing you to run along the wall’s surface without damaging it.
Once the wall has been cleared of all the old and broken render, use your breaker and chisel to remove the render’s edges to ensure no remaining damaged areas.
2. Brush the wall and clear it of debris
The next task is to clean the wall after all the outdated and damaged renders have been removed. Use an old masonry brush or a hand brush to completely remove any dust or dirt from the exposed walls’ surface and any cracks or holes that may be present, working your way down from the top.
Give the render edge that is now revealed a good brushing to eliminate dust or other debris. The area must be thoroughly cleaned because any dust or debris left behind could interfere with how well your fresh render adheres to the surface, potentially resulting in a recurrence of the problem you are now trying to fix.
3. Combine and use a base
The following task is to mix and apply a base to the wall once the surface has been thoroughly cleaned. This will aid in the initial coat of render adhering to the wall’s surface and stop the drywall from absorbing the render’s moisture before it has had time to cure.
Pour a few inches of the base into the bottom of an old bucket, then add equal parts water to make a 50/50 mixture.
After combining the mixture, coat the area where the render was removed with an old masonry brush. Make sure you also completely coat the exposed render’s edges.
4. Fill in Cracks and Holes
The next step is repairing any holes or significant depressions once the base coat has been applied completely and has had time to cure. To create a smooth, 5 to 6mm thickness on the wall, we want the initial layer of render to go on as level a surface as possible. It will cure evenly throughout its entire surface if it is a constant thickness.
Apply a 50/50 sand mixture—50% sharp sand and 50 percent soft sand at a 4:1 proportion, for example, four sand to 1 cement—to any holes.
To make as even and smooth a surface as you can push the mix completely into each hole.
5. Mix Initial Render Coat
Now that the bare wall has been properly ready for render, it can be painted. The initial coat of the render, also known as the scratch coat, is applied to the wall in a relatively thin layer—only 5 to 6 mm thick.
The ratio of the first coat of render to the second coat is 5:1. The render mixture is then applied to the surface of the wall using a plasterer’s trowel and a hawk, much like plaster. The trowel is loaded from the hawk once it has been loaded.
Push the render mixture into the wall as you apply it, so it adheres, then spread it to a consistent thickness of between 5 and 6 mm. To achieve a strong binding, carefully drive the render mix into the margins of the pre-existing render.
Use a polyurethane float with five or six screws or a scratch comb put in one end to create a scratch coat after the first coat has completely dried on the wall.
The scratch coat is crucial because it establishes a strong bond for the final top coat, which will not adhere properly without it.
6. Corner Freehand Rendering
If it’s your first time, applying render in a straight line over a wall can be a little challenging, but it’s nothing that can’t be accomplished with little patience and practice.
Corners are a little difficult to make freehand without a definite edge to follow if you’ve never done it before.
Take your time and build that corner up gradually if you want to do it perfectly. If you put it on too deeply, it will simply fall off the wall. Once there, begin shaping the corner with your trowel.
You can smooth it over with a polyurethane float and sponge once it has been as much as feasible shaped.
7. Combine and use a second coat
There are some things to be mindful of before applying the second coat after the first coat has been done to the wall. As we have stated, this is in contrast to plastering, when the thick coat is put first, and the thinner top coat is applied later.
In light of this, you should wait a few hours before applying the top coat. The top coat is thick and heavy (about 10mm), and if the first, thinner coat isn’t strong enough to support the weight, the heavy top coat will drag it out off the wall.
However, you do not want the first coat to be completely dry before applying it because if you do, the top coat will suck all the moisture out before it cures properly.
If it dries out too much, soak the wall—that is, thoroughly soak it in water until it is dripping wet—before applying your top coat.
For a total thickness of between 15 and 16mm over the two coats, the second coat needs to be applied until it is about 10mm thick.
Push the render mixture into the wall during application to provide a strong bond and work it into the existing plaster edges.
8. Drag Render off excess and smooth over
After the second coat has been applied to the wall, we must begin to level it somewhat off. Lay a piece of wood over the render with either end resting on the existing plaster using a spirit level or a plasterer’s darby.
Remove any high spots by running your straight edge over the rendered area’s whole surface. The top coat should be slightly lower than the current render level.
Use a flat polyurethane trowel to smooth and compact the surface once all high spots have been removed, ensuring it is slightly below the render surface. Rub the surface in a circular motion to ensure it is completely covered.
Final Words
The final step is to get the sponge out and sponge the entire surface once the top coat render has been troweled over.
To avoid the render clinging to the sponge as you brush it over the surface, make sure the sponge is just damp enough to use. The sponge must first be wet before being wrung out to prevent drips before use.
Sponging has two effects: first, it helps to cover the surface and stop any moisture or water from penetrating, and second, it helps to smooth over any rough parts.
Filling in any minor gaps or depressions at this point is also a good idea. Just scoop some render onto your sponge, apply it to the desired spot, and then wipe it away.
In terms of correcting the render, you’re essentially done once the entire area has been sponged and smoothed. There are many different render kinds, as we have mentioned, and if you want a smooth finish, you may wait until it has completely dried before painting it.