Introduction
The unpredictable British weather is not only a topic of constant conversation but also a challenge for home improvement projects. Today, we address the process of preparing a wall for plaster, ensuring your home remains unscathed regardless of drizzles, downpours, or even sunrays. With our professional experience in the industry, let’s explore exterior wall coatings and weatherproofing.

The Importance of Proper Wall Preparation for Plaster Application
Adequate wall preparation is critical to the success and longevity of an exterior wall coating. It not only ensures a smooth and even surface for the new plaster to adhere to but also forms a crucial barrier against the elements. Here are some reasons why proper wall preparation is of utmost importance:
- Enhanced adhesion: Thoroughly cleaned and primed surfaces provide a strong bond between the wall and the plaster. This prevents premature peeling or flaking, ensuring that your home remains protected and visually appealing for a longer period.
- Durability: Properly preparing your wall helps create a robust barrier against the unpredictable British weather. A well-prepared surface allows the plaster to perform at its best, shielding your home from moisture, temperature fluctuations, and even UV damage.
- Aesthetic appeal: A well-prepared wall allows for a smooth, even application of plaster, enhancing the overall appearance of your home’s exterior. A uniform and seamless finish contributes to your home’s curb appeal and reflects your attention to detail.
- Cost-effectiveness: Investing time and effort into preparing your wall ensures that the plaster lasts longer, reducing the need for frequent maintenance or repairs. In the long run, this saves you money and the hassle of redoing the work sooner than necessary.
- Preventing structural damage: Proper wall preparation can help identify and address underlying issues such as cracks, mould, and efflorescence. Timely intervention prevents these problems from escalating, safeguarding the structural integrity of your home.
- Improved energy efficiency: A well-prepared and plastered wall can contribute to your home’s overall energy efficiency by providing an extra layer of insulation. This helps to regulate indoor temperatures, keeping your home warm in the winter and cool in the summer, ultimately reducing energy costs.
Examining the Wall Condition
Begin by inspecting the wall for any signs of damage. Early identification of potential issues will save time and prevent complications. Here are some common problems to look for:
- Cracks: Hairline cracks or more significant fissures in the wall can result from various factors, including temperature fluctuations, moisture penetration, and natural settling of the structure. If left unaddressed, these cracks can widen and lead to structural damage or increased water infiltration. It is essential to repair them before applying new plaster.
- Flaking paint or plaster: Over time, paint and plaster may peel or flake due to natural wear and tear, moisture, or poor adhesion. This issue not only detracts from the wall’s appearance but also weakens the surface, making it unsuitable for new plaster application. Thoroughly remove any loose paint or plaster to ensure a strong bond between the wall and the new plaster.
- Efflorescence (white stains): Efflorescence is a common issue, characterized by powdery white deposits on the wall’s surface. It occurs when moisture penetrates the masonry and dissolves salts within the material. As the moisture evaporates, the salts crystallize on the surface, leaving unsightly white stains. If not properly addressed, efflorescence can weaken the plaster and compromise its integrity. Remove these stains and treat the cause of the moisture penetration to prevent future occurrences.
- Mould or algae growth: Mould and algae growth on exterior walls often result from damp conditions or inadequate drainage. Besides being unsightly, these growths can lead to further damage by retaining moisture on the wall’s surface, weakening the structure, and creating potential health hazards. Remove any mould or algae and identify the cause of the dampness to prevent future growth.
If you are uncertain about your wall’s condition or need assistance in diagnosing the issues, consider enlisting the help of a professional wall inspection service. A thorough inspection will provide valuable insights and recommendations, ensuring that your wall is in the best possible condition before applying new plaster.
Book a service with our team today.
Cleaning the Wall
After identifying any issues, clean the wall to create an ideal surface for the new plaster. Use a pressure washer to remove dirt, loose paint, and debris. Remember to wear protective gear, as this process can be messy. For stubborn dirt, use a wire brush to ensure a pristine surface.
Repairing Cracks and Damaged Areas
After cleaning the wall, it’s time to tackle any cracks or damage to ensure a strong and long-lasting plaster application. Addressing these issues properly is crucial for maintaining your wall’s structural integrity and preventing future problems. Here’s a more detailed guide on repairing cracks and damaged areas:
- Small cracks and holes: For minor imperfections, such as hairline cracks or small holes, use a suitable exterior filler designed specifically for outdoor use. Apply the filler according to the manufacturer’s instructions, filling the crack or hole completely to ensure a robust repair. Allow the filler to dry, which may vary depending on the product, and then sand the area with medium-grit sandpaper to create a smooth, even surface.
- Larger cracks: When dealing with more significant cracks, masonry repair mortar is often necessary to achieve a durable, long-lasting repair. Begin by removing any loose material from the crack using a wire brush, then moisten the area to improve adhesion. Mix the repair mortar as per the manufacturer’s guidelines and apply it with a pointing trowel, ensuring that the crack is entirely filled. Smooth the surface with the trowel, and allow the mortar to cure according to the product specifications.
- Sealing the repaired area: To further protect the repaired area from moisture and prevent future damage, consider applying a waterproof sealant over the repair. This step adds an extra layer of protection, helping to maintain the wall’s integrity and extend the life of your plaster application.
- Addressing structural issues: If the cracks or damage indicate more extensive structural issues, it’s essential to consult a professional for guidance. In such cases, structural repairs or interventions may be necessary to ensure the safety and stability of your home before applying new plaster.
By carefully repairing any cracks and damaged areas, you create a strong and even surface for your new plaster application.
Applying a Primer
To enhance plaster adhesion, apply a high-quality exterior primer compatible with the chosen plaster. Ensure even coverage and, if necessary, apply a second coat on porous or uneven surfaces. Allow the primer to dry according to the manufacturer’s instructions.
Masking Off and Protecting Adjacent Areas
To maintain a tidy workspace and avoid plaster on unintended surfaces, use masking tape and plastic sheeting to protect adjacent areas. This step, while seemingly tedious, saves time and effort in the long run.
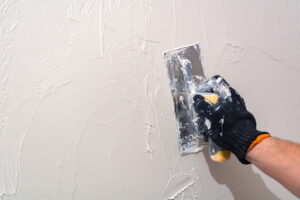
Applying the Plaster
With the wall prepped and primed, it’s time to apply the plaster. Choose a high-quality, weather-resistant plaster suitable for exterior use, such as silicone render or acrylic render. These types of render offer excellent durability, flexibility, and resistance to the elements, ensuring a long-lasting and visually appealing finish for your home.
Following the manufacturer’s instructions, mix and apply the plaster using a stainless steel trowel, maintaining a uniform thickness. Adjust any uneven areas, as needed.
After completing the application, allow the plaster to dry for the recommended duration, which may vary depending on the specific product and environmental conditions. Be mindful of the weather forecast, as extreme temperatures, excessive moisture, or direct sunlight can affect the curing process.
By carefully selecting, mixing, and applying the plaster, you’ll create a durable and attractive exterior wall coating that will stand up to the elements and enhance the overall appearance of your home.
Conclusion
You have now successfully prepared and plastered your wall, ready to withstand the ever-changing British weather. Take a moment to appreciate your handiwork, knowing that your home is well protected and aesthetically pleasing.
Remember, proper preparation is the cornerstone of an effective exterior wall coating. By following these steps and using high-quality materials, you’ll achieve a professional finish that will undoubtedly impress your neighbours.
In conclusion, diligently preparing your wall and applying plaster ensures your home remains safeguarded and visually appealing. So, as you admire your well-executed project, feel free to share your newfound expertise with friends and family. They might just find your wall-prepping skills and sense of humour irresistible.
Happy plastering, and here’s to a resilient, blister-free wall for years to come!